How to show multiple windows in Mac Catalyst and iPad apps
Download materialsMultiple windows support is a handy feature that users can benefit from on iPad and Mac. Imagine creating a new task and seeing another one or a project side by side on an iPad or having them in separate windows on a Mac. Such functionality can increase users' productivity and experience. In this article, let's look at the implementation details using a Mac Catalyst app as an example.
You can download a sample project on GitHub.
Task Flow: Task Manager App
Task Flow offers innovative features like multi-project tasks and the 'My Task Flow' concept. On top of the project structure, you get an endlessly flexible Task Flow view that suits the way you think and work. Available on iPhone, iPad, Mac and Apple Vision.
Try it now!
Adding multiple windows support
The starting point is to enable multiple windows support in the app target settings. This will enable creating new windows with the default configuration. Go to your app target General settings and enable "Supports multiple windows" checkbox:
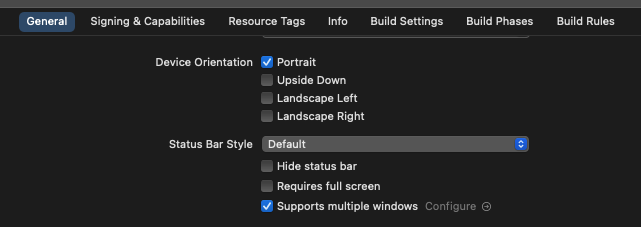
Once enabled, you'll see a "Configure" button on the right of the option. If your project already uses the SceneDelegate class to manage life-cycle events, which is a default for projects created after the release of iOS13, then you're basically done with the initial setup. If not, you should add a SceneDelegate class and a default Scene Configuration in the Info.plist.
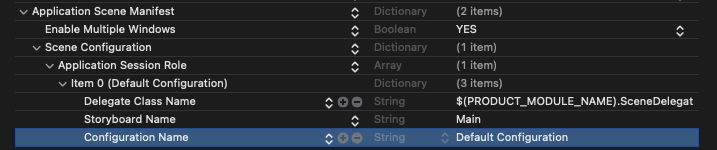
Eventually, to proceed with the multiple windows support, you should have a "Default Configuration" in the Info.plist Scene Configuration:
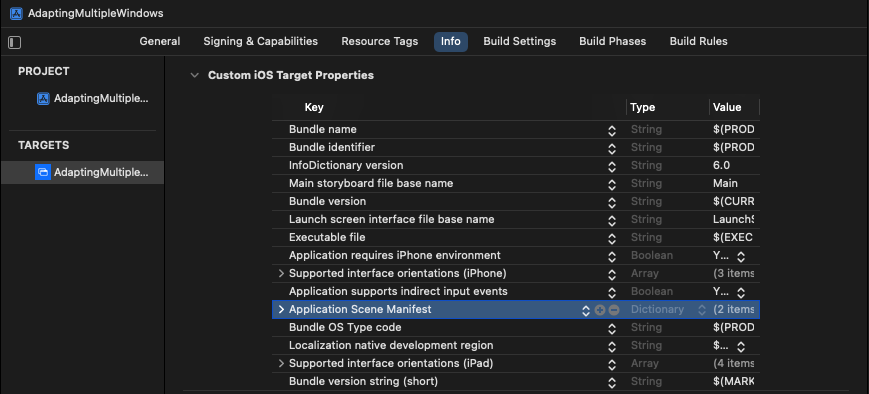
If you don't have Info.plist file in your project, then you can find it in your app target settings Info tab under the "Custom iOS Target Properties" section:
With only one checkbox, you can now create a new window! Run your app on a Mac and press ⌘ + N to see it in action.
If you want to make a new window from your code, just call the requestSceneSessionActivation API:
private func requestNewWindow() {
    UIApplication.shared.requestSceneSessionActivation(nil, userActivity: nil, options: nil) { error in
        // handle errors
    }
}
This could be already useful for some types of apps. But as Apple recommends in their WWDC19 session Introducing Multiple Windows on iPad, you should think if your app actually needs this.
Open a new Custom Window
Now let's go a step further and create a new type of window. This time we have to create a separate Scene Configuration and configure it. A scene configuration is configured by a scene delegate, so we'll start by creating a class conformed to UIWindowSceneDelegate protocol. And we'll save a reference to the window to use it in the future.
class NewTaskSceneDelegate: NSObject, UIWindowSceneDelegate {

    var window: UIWindow?

    func scene(_ scene: UIScene, willConnectTo session: UISceneSession, options connectionOptions: UIScene.ConnectionOptions) {
        guard let windowScene = (scene as? UIWindowScene) else { return }

        let window = UIWindow(windowScene: windowScene)
        self.window = window
    }
}
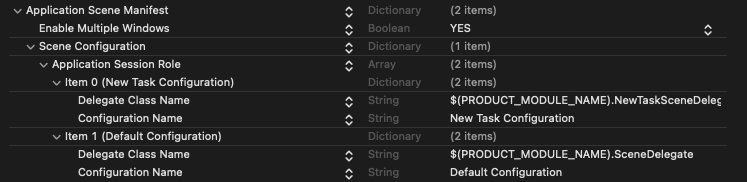
The next step is to tell the system when to use this scene delegate. Go to the Info.plist (or Custom iOS Target Properties) and add a new configuration below the "Application Session Role". We specify the configuration name and the scene delegate that should be associated with it:
With that, we're ready to create a new window. We're going to use the same method as we used previously, but now we'll also provide an NSUserActivity as a parameter which will be used later to determine the type of window we want to create:
private func requestNewTaskWindow() {
    let activity = NSUserActivity(activityType: "NewTaskWindow")

    UIApplication.shared.requestSceneSessionActivation(nil, userActivity: activity, options: nil) { (error) in
        // handle errors
    }
}
We can add some context information using
.userInfoproperty to the user activity if needed.
Calling requestSceneSessionActivation will trigger AppDelegate's configurationForConnecting method asking us for a scene configuration. We'll return a specific UISceneConfiguration depending on the user activity type. The scene configuration should contain the same name that we've added to the Info.plist configuration:
class AppDelegate: UIResponder, UIApplicationDelegate {
    ...

    func application(_ application: UIApplication, configurationForConnecting connectingSceneSession: UISceneSession, options: UIScene.ConnectionOptions) -> UISceneConfiguration {
        if options.userActivities.first?.activityType == "NewTaskWindow" {
            return UISceneConfiguration(name: "New Task Configuration", sessionRole: connectingSceneSession.role)
        } else {
            return UISceneConfiguration(name: "Default Configuration", sessionRole: connectingSceneSession.role)
        }
    }
}
That's it! You can now call the requestNewTaskWindow() method and see the result. In the code sample project I've also added a SwiftUI view with two text fields and wrapped it inside a UIHostingController. Also, it's a good practice to define the window max size for Mac Catalyst app and configure the window toolbar. Here is how the NewTaskSceneDelegate might look like:
import UIKit
import SwiftUI

class NewTaskSceneDelegate: UIResponder, UIWindowSceneDelegate {

    var window: UIWindow?

    func scene(_ scene: UIScene, willConnectTo session: UISceneSession, options connectionOptions: UIScene.ConnectionOptions) {
        guard let windowScene = (scene as? UIWindowScene) else { return }

        let newTaskScreen = NewTaskScreen()
        let hostingController = UIHostingController(rootView: newTaskScreen)
        let window = UIWindow(windowScene: windowScene)
        window.rootViewController = hostingController
        window.windowScene?.title = "New Task"
        window.makeKeyAndVisible()

        self.window = window

        #if targetEnvironment(macCatalyst)
        configureMacWindowSize()
        configureToolbar()
        #endif
    }

    #if targetEnvironment(macCatalyst)

    private func configureMacWindowSize() {
        guard let window = window else { return }

        let fixedSize = CGSize(width: 400, height: 250)
        window.windowScene?.sizeRestrictions?.minimumSize = fixedSize
        window.windowScene?.sizeRestrictions?.maximumSize = fixedSize
    }

    private func configureToolbar() {
        let toolbar = NSToolbar()
        toolbar.showsBaselineSeparator = false

        if let titlebar = window?.windowScene?.titlebar {
            titlebar.toolbar = toolbar
            titlebar.toolbarStyle = .automatic
            titlebar.titleVisibility = .visible
        }
    }
    #endif
}
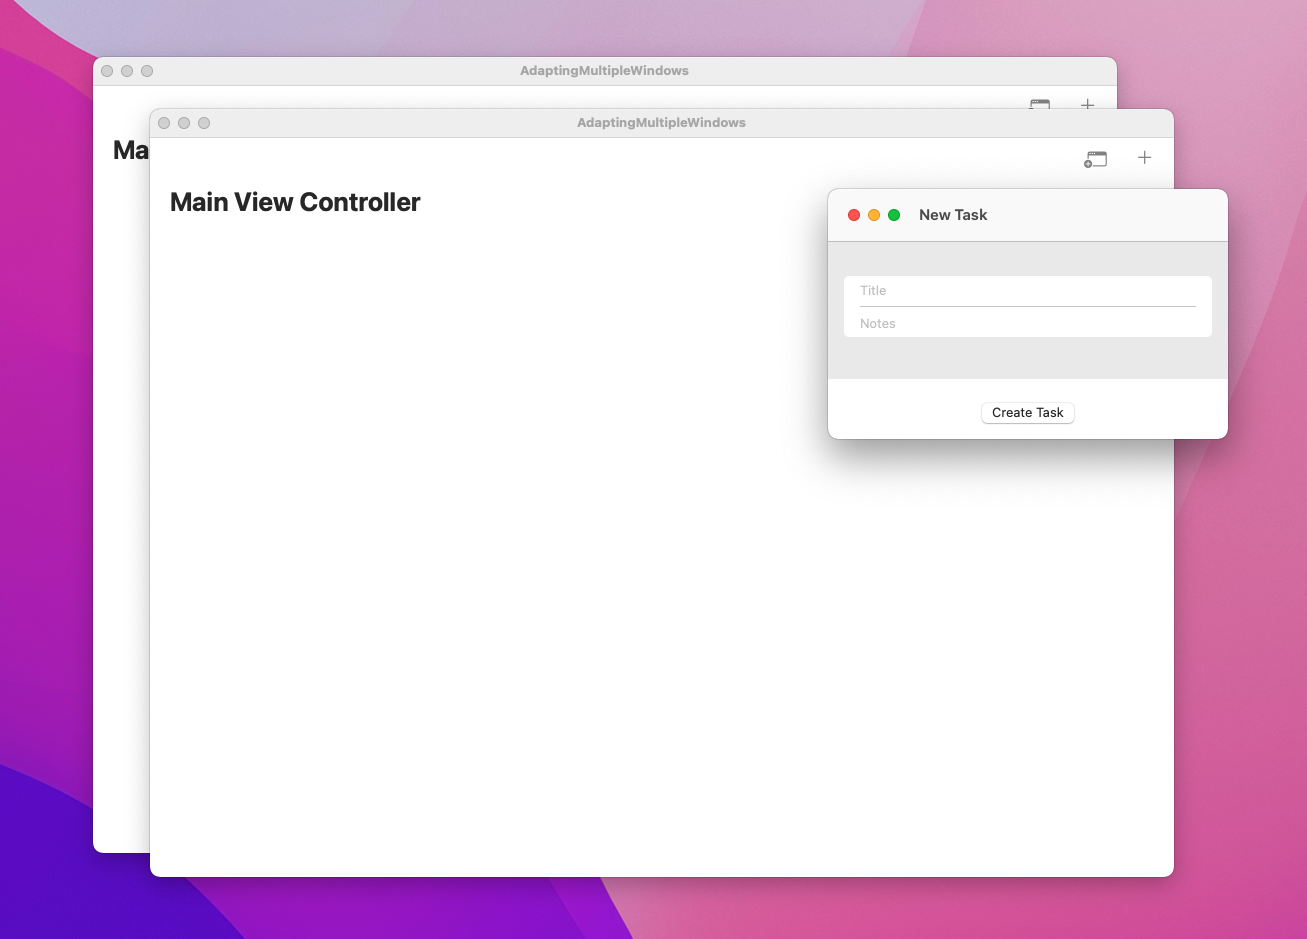
Now we can run the app on iPad or Mac and create new windows:
Task Flow: Task Manager App
Task Flow offers innovative features like multi-project tasks and the 'My Task Flow' concept. On top of the project structure, you get an endlessly flexible Task Flow view that suits the way you think and work. Available on iPhone, iPad, Mac and Apple Vision.
Try it now!
Conclusion
Multiple windows support can be a nice feature that enriches user experience. As you've seen in the article, the implementation is very straightforward and easy. However, before adding it to your project, think if you actually need it.
I hope you enjoyed this article. If you have any questions, suggestions, or feedback, please let me know on Twitter.
You can download a sample project with the implementation via the link at the top of the page.
Thanks for reading!