How to create a UICollectionView List with Compositional Layout and UIDiffableDataSource in Swift
Download materialsLists are used in almost every iOS app. Before iOS14, UIKit framework offered us only a UITableView to build lists. This changed in iOS14, when Apple introduced a UICollectionViewCompositionalLayout with a List configuration that we can use. In this article, I would like to show a step-by-step guide on building a list layout for a collection view in iOS14 and iOS15. We'll also use a UICollectionViewDiffableDataSource to improve the user experience and performance.
This is the first article in the series about UICollectionView with a list configuration. In the next articles, I'll explain how to deselect cells on transition, configure swipe actions, drag and drop, and much more!
You can find a sample project for this article on GitHub.
Task Flow: Task Manager App
Task Flow offers innovative features like multi-project tasks and the 'My Task Flow' concept. On top of the project structure, you get an endlessly flexible Task Flow view that suits the way you think and work. Available on iPhone, iPad, Mac and Apple Vision.
Try it now!
Overview
There are a few steps that we will do in this project to achieve a final result:
- Create
UICollectionViewCompositionalLayoutand aUICollectionView - Configure
UICollectionViewDiffableDataSourcefor cells and section headers - Make an
NSDiffableDataSourceSnapshotand apply it to the data source
As a result, we will make a two sectioned list as shown below: 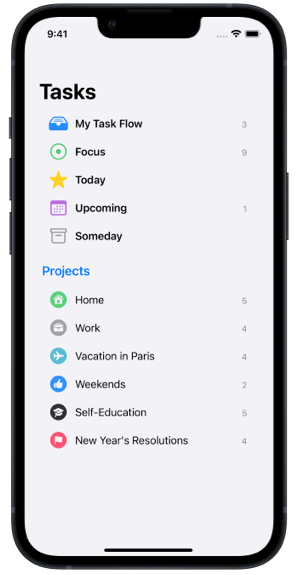
Create UICollectionViewCompositionalLayout
UICollectionViewCompositionalLayout is a highly adaptive and flexible layout introduced in iOS13. If you haven't already, take a look at the official docs. You can build almost any type of layout using it, but in this article, we'll use a preconfigured list layout that can be accessed with a few lines of code:
private func createLayout() -> UICollectionViewLayout {
    let config = UICollectionLayoutListConfiguration(appearance: .sideBar)
    return UICollectionViewCompositionalLayout.list(using: config)
}

private func configureHierarchy() {
    let layout = createLayout()
    collectionView = UICollectionView(frame: view.bounds, collectionViewLayout: layout)

    collectionView.autoresizingMask = [.flexibleWidth, .flexibleHeight]
    view.addSubview(collectionView)
    collectionView.delegate = self
}
That is all you need to create a list layout. We've used a sidebar appearance, but plain, grouped, insetGrouped, and sidebarPlain are also available.
But what if we want to have more control and make our sections different? If we look at the final screenshot, we have two sections: predefined groups and user-created projects. Also, we have a section header for the projects section.
Luckily, we can configure our sections using the sectionProvider when we are creating a UICollectionViewCompositionalLayout. First, we define the sections enum:
enum Section: Int, CaseIterable {
    case groups
    case projects
}
We used
Intas raw values and made itCaseIterableto add sections to the dataSource later.
What is a sectionProvider? It's a closure that is called when the collectionView wants to create a layout. It wants from us a section layout for a given section index and layout environment. We'll skip the layout environment now, but keep in mind that it can be helpful if you want to customize the layout depending on the collectionView size. For example, you can have a different number of items in a row depending on the available width.
Here is our sectionProvider and the new layout initializer:
private func createLayout() -> UICollectionViewLayout {
    let sectionProvider = { (sectionIndex: Int, layoutEnvironment: NSCollectionLayoutEnvironment) -> NSCollectionLayoutSection? in
        guard let sectionKind = Section(rawValue: sectionIndex) else { return nil }

        var configuration = UICollectionLayoutListConfiguration(appearance: .sidebar)
        configuration.showsSeparators = false

        switch sectionKind {
        case .groups:
            configuration.headerMode = .none
        case .projects:
            configuration.headerMode = .supplementary
        }

        return NSCollectionLayoutSection.list(using: configuration, layoutEnvironment: layoutEnvironment)
    }

    let layout = UICollectionViewCompositionalLayout(sectionProvider: sectionProvider)
    return layout
}
I've opted-in intentionally to using .supplementary header mode to demonstrate how you can configure it. But if you want, you can set it to .firstItemInSection and just add an additional item to the snapshot that we'll create very soon. Now that the layout is done, we are moving to the data source configuration.
Configuring UICollectionViewDiffableDataSource for Cells and Section Headers
Defining Section and Item Types
The UICollectionViewDiffableDataSource contains of sections and items. When we initialize the dataSource, we should say what Types we're going to use for both of them. We already defined an enum for sections. Now let's do the same for items.
For performance reasons, it's recommended to feed the dataSource with unique IDs rather than the models. In multiple sections collection views I like to wrap the ID as an associated value for enum, like this:
enum Item: Hashable {
    case group(Int)
    case project(Int)
}
In a real project, you're likely to provide an ID from your database as an associated value. For instance, if you're using
CoreData, then it can becase project(NSManagedObjectID).
With that we can define the data source type:
class ViewController: UIViewController {
    enum Section: Int, CaseIterable {
        case groups
        case projects
    }

    enum Item: Hashable {
        case group(Int)
        case project(Int)
    }

    private var dataSource: UICollectionViewDiffableDataSource<Section, Item>!
    ...
}
Data Source Cell Provider
Just like we created a sectionProvider for the layout, we will make a cellProvider to initialize the dataSource. For each item that we add to the dataSource, it will ask for a cell providing us with a collectionView, indexPath, and item. There is one thing we should do in advance, a cell registration, where we will also configure the cells' content.
Let's look at a cell registration for the groups' section using the latest iOS15 API (the iOS14 solution is in the sample project). As a content source, I'm using a TasksGroup enum with computed properties for title, symbolName, and symbolColor:
private func makeGroupsCellRegistration() -> UICollectionView.CellRegistration<UICollectionViewListCell, Int> {
    return UICollectionView.CellRegistration<UICollectionViewListCell, Int> { [weak self] (cell, indexPath, groupId) in
        guard let self = self,
                let tasksGroup = TasksGroup(rawValue: groupId)
        else { return }

        let icon = UIImage(systemName: tasksGroup.symbolName)
        let randomNumberOfTasks = Int.random(in: 0..<10) // to randomly populate subtitle

        var content = UIListContentConfiguration.sidebarCell()

        content.image = icon
        content.text = title

        if randomNumberOfTasks > 0 {
            content.secondaryText = String(randomNumberOfTasks)
        }

        content.textProperties.font = UIFont.preferredFont(forTextStyle: .headline)
        content.textProperties.color = .label
        content.secondaryTextProperties.color = .secondaryLabel

        content.imageProperties.tintColor = tasksGroup.symbolColor
        content.imageProperties.preferredSymbolConfiguration = UIImage.SymbolConfiguration(pointSize: 26)
        content.imageToTextPadding = 12

        content.directionalLayoutMargins = NSDirectionalEdgeInsets(top: 0, leading: 20, bottom: 0, trailing: 20)

        content.prefersSideBySideTextAndSecondaryText = true

        cell.contentConfiguration = content

        cell.configurationUpdateHandler = { [unowned self] (cell, state) in
            // Adjust the background configuration
            var background = UIBackgroundConfiguration.listSidebarCell().updated(for: state)
            if state.isHighlighted {
                background.backgroundColor = .secondarySystemFill
            } else if state.isSelected {
                background.backgroundColor = .secondarySystemFill
            }
            cell.backgroundConfiguration = background
        }
    }
}
I've used a default sidebar cell configuration as this type of view controller is ideal to be used as a sidebar in an iPad and Mac app with a
UISplitViewController. On iPhone, it also looks good :).
Here, we've configured the cell's background configuration in the
configurationUpdateHandleravailable in iOS15. To override the default background configuration in iOS14, we should create a custom cell class and configure the background there. You can find the implementation in the sample project.
And because the project cell registration is very similar, it's worth refactoring out the configuration logic to reusable private methods. This and some additional adjustments can also be found in the sample project.
Now we are ready to configure our data source:
private func configureDataSource() {
    // Cell Registrations
    let groupsCellRegistration = makeGroupsCellRegistration()
    let projectCellRegistration = makeProjectCellRegistration()

    dataSource = UICollectionViewDiffableDataSource<Section, Item>(collectionView: collectionView, cellProvider: { collectionView, indexPath, item in
        switch item {
        case .group(let groupId):
            let cell = collectionView.dequeueConfiguredReusableCell(using: groupsCellRegistration, for: indexPath, item: groupId)
            return cell

        case .project(let projectId):
            let cell = collectionView.dequeueConfiguredReusableCell(using: projectCellRegistration, for: indexPath, item: projectId)
            return cell
        }
    })
}
Important! You should create cell registrations outside of the cell provider closure to avoid retain cycles.
Data Source Supplementary View Provider
Remember that we also wanted to show section headers? Now is the time! The idea here is very similar to how we've configured the cells. We are going to create a supplementaryViewProvider that is called when the collection view wants to render a supplementary view like header, footer, or badge:
private func configureSupplementaryViews() {
    // Supplementary registrations
    let headerCellRegistration = makeSectionHeaderRegistration()

    dataSource.supplementaryViewProvider = { (collectionView, elementKind, indexPath) -> UICollectionReusableView? in
        if elementKind == UICollectionView.elementKindSectionHeader {
            return collectionView.dequeueConfiguredReusableSupplementary(using: headerCellRegistration, for: indexPath)
        } else {
            return nil
        }
    }
}

private func makeSectionHeaderRegistration() -> UICollectionView.SupplementaryRegistration<UICollectionViewListCell> {
    return UICollectionView.SupplementaryRegistration<UICollectionViewListCell>(elementKind: UICollectionView.elementKindSectionHeader) { (headerView, _, indexPath) in
        guard let sectionKind = Section(rawValue: indexPath.section) else { return }

        var content = UIListContentConfiguration.sidebarHeader()
        content.text = sectionKind.sectionTitle
        content.textProperties.color = .systemBlue
        headerView.contentConfiguration = content
    }
}
Important! To avoid retain cycles, you should create the supplementary registrations outside of the supplementary view provider closure.
With that, our collection view knows what to do with the data that can be applied to the data source. So, let's add the data.
Applying the Data Source Snapshot
Our data source needs a snapshot of the data we want to display. The snapshot itself is a representation of sections and items within these sections. The beauty of the diffable data source is that it can update the collection view's state in a smart way. When we provide a new snapshot, under the hood, it'll find the changes that the new snapshot and apply them in the most efficient way, all with nice animations.
There are two types of snapshots: NSDiffableDataSourceSnapshot and NSDiffableDataSourceSectionSnapshot. The latter should be used when you want to have parent-child relations between items with a collapse / expand behaviour. It's also a bit more complicated when it comes to refreshing the data as you work with each section separately, not with a whole snapshot. For the purpose of our sample collection view, using the regular NSDiffableDataSourceSnapshot is sufficient. I have extensively used section snapshots, so if you want me to share some of the experiences and pitfalls that you can face working with it, let me know on Twitter.
First, we create a method that will generate a new snapshot with all the sections and items that we want to show:
private func makeSnapshot() -> NSDiffableDataSourceSnapshot<Section, Item> {
    var snapshot = NSDiffableDataSourceSnapshot<Section, Item>()

    snapshot.appendSections(Section.allCases)

    let groupItems = TasksGroup.allCases.map { Item.group($0.id) }
    snapshot.appendItems(groupItems, toSection: .groups)

    let sortedProjectItems = Array(projects.values) // array of projects from the dictionary. [Project]
        .sorted(by: { $0.order < $1.order }) // sorted by order. [Project]
        .map { Item.project($0.id) } // wrapped into Items. [Item]
    snapshot.appendItems(sortedProjectItems, toSection: .projects)

    return snapshot
}
The code above is self-explanatory. We start by creating an empty snapshot. Then, after adding the sections, we make items for each section and apply them to the respective sections.
Now let's apply the snapshot to the data source:
private func refreshSnapshot() {
    let newSnapshot = makeSnapshot()

    let shouldAnimate = collectionView.numberOfSections != 0
    dataSource.apply(newSnapshot, animatingDifferences: shouldAnimate, completion: nil)
}
Tip! You don't want any animations when you apply the snapshot initially. Using
shouldAnimateboolean solves this.
It's time to call the refreshSnapshot() method in the end of the configureDataSource() or in the end of the viewDidLoad(). Then call it each time you want to update the UI with the updates.
And with that, our sample app is complete.
Performance advice
Making and applying the snapshot are highly optimized under the hood. So it's safe to apply a new snapshot even for every small change you want to add. However, there are some recommendations that you should follow.
The most important one is that items in the data source should be lightweight. Although you can apply custom types of objects, you should add only unique IDs whenever possible. It is more efficient to fetch all the data in the cell registration using the object ID. In the example above, we've used a dictionary with projects. In a real app, you can get all the info from the database using a unique ID.
In addition, the data source can have a large number of such IDs, given that the collection view will ask for the cell content only when it is about to render the cell. You don't need the pagination to optimize the performance if you've used the data source properly.
There is a whole WWDC21 session focused on the Collection View performance that is worth watching: Make blazing fast lists and collection views.
If you follow the recommendations, your UI will be nice and smooth even on ProMotion displays.
Task Flow: Task Manager App
Task Flow offers innovative features like multi-project tasks and the 'My Task Flow' concept. On top of the project structure, you get an endlessly flexible Task Flow view that suits the way you think and work. Available on iPhone, iPad, Mac and Apple Vision.
Try it now!
Conclusion
This article shows how you can create beautiful and performant lists using UICollectionView with CompositionalLayout List configuration. Using UICollectionViewDiffableDataSource gives us performance, easy to use API, and nice animations for item changes.
Collection view lists have much more functionality that you can apply out of the box. In future articles, I'll write about the swipe actions, drag and drop, expand and collapse handlers, context menu, and much more. Stay tuned!
I hope you enjoyed this article. If you have any questions, suggestions, or feedback, please let me know on Twitter.
You can download a sample project with the implementation via the link at the top of the page.
Thanks for reading!